How to Set Up the Perfect Rack for Home or Office
, 3 min reading time
, 3 min reading time
Setting up a well-organized rack is not just a matter of aesthetics: it directly influences the performance, maintenance, and even the longevity of your network equipment. Whether for a home lab, a small office, or a larger infrastructure, following some best practices will guarantee a clean, functional, and scalable result.
The first step is to select a rack suitable for your space and network needs.
Height (U): for home or small offices, 6U to 15U are usually sufficient. Larger environments may require 22U, 27U or more.
Depth: check compatibility with switches, servers, and UPS units.
Closed vs open: closed racks offer better security and controlled airflow; open ones are more accessible and economical.
Installation: there are floor and wall-mounted options — choose based on available space.
A perfect rack starts on paper.
Make an inventory of equipment (switches, patch panels, UPS, router, NAS, etc.).
Define the assembly order: typically UPS at the bottom, switches in the middle, patch panels at the top.
Reserve space for future expansion — never fill the rack to its limit.
Nothing compromises a rack more than disorganized cables. Here are some tips:
Use patch cords of the right length (neither too short nor too long with excess).
Invest in horizontal and vertical guides to keep cables aligned.
Prefer reusable velcro instead of plastic cable ties.
Label each cable with tags or numbered terminals.
💡 NetPatch tip: opting for thin cables (such as UniFi Etherlighting or slim patch cords) improves airflow and facilitates maintenance.
Order makes a difference:
UPS and PDU: at the bottom for better stability.
Switches: in the center, close to patch panels, for short and organized cables.
Patch panels: always above switches, creating clean connection lines.
Equipment sensitive to noise/temperature: keep them away from each other and with adequate ventilation.
Ensure front-to-back airflow: do not obstruct ventilation inlets/outlets.
If necessary, add rack fans for air circulation.
Use UPS to protect against power failures.
Plan power distribution with PDU (Power Distribution Units) to avoid crossed cables.
A well-mounted rack conveys professionalism and facilitates any future intervention.
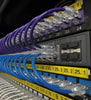
Standardize cable colors for different functions (e.g., blue = data, yellow = PoE, red = uplinks).
Document the installation: keep a network map and port correspondence.
Photograph the final result — useful for reference and to show the evolution of your infrastructure.
A perfect rack doesn't happen by chance: it's the result of planning, organization, and attention to detail. Beyond making maintenance simpler, it conveys confidence and ensures that your network is prepared to grow in an orderly manner.
At NetPatch, we believe that a well-mounted rack is the foundation of a quality network. That's why we offer not only UniFi equipment, but also cables, patch panels, and cable management accessories so that your project is flawless from start to finish.


